Full-stack development in Project IDX
Posted by Kaushik Sathupadi, Prakhar Srivastav, and Kristin Bi – Software Engineers; Alex Geboff – Technical Writer We launched Project IDX, our experimental, new browser-based development experience, to simplify the chaos of building full-stack apps and streamline the development process from (back)end to (front)end. In our experience, most web applications are built with at-least two different layers: a frontend (UI) layer and a backend layer. When you think about the kind of app you’d build in a browser-based developer workspace, you might not immediately jump to full-stack apps with robust, fully functional backends. Developing a backend in a web-based environment can get clunky and costly very quickly. Between different authentication setups for development and production environments, secure communication between backend and frontend, and the complexity of setting up a fully self-contained (hermetic) testing environment, costs and inconveniences can add up. We know a

 Posted by Kaushik Sathupadi, Prakhar Srivastav, and Kristin Bi – Software Engineers; Alex Geboff – Technical Writer

We launched Project IDX, our experimental, new browser-based development experience, to simplify the chaos of building full-stack apps and streamline the development process from (back)end to (front)end.
In our experience, most web applications are built with at-least two different layers: a frontend (UI) layer and a backend layer. When you think about the kind of app you’d build in a browser-based developer workspace, you might not immediately jump to full-stack apps with robust, fully functional backends. Developing a backend in a web-based environment can get clunky and costly very quickly. Between different authentication setups for development and production environments, secure communication between backend and frontend, and the complexity of setting up a fully self-contained (hermetic) testing environment, costs and inconveniences can add up.
We know a lot of you are excited to try IDX yourselves, but in the meantime, we wanted to share this post about full-stack development in Project IDX. We’ll untangle some of the complex situations you might hit as a developer building both your frontend and backend layers in a web-based workspace — developer authentication, frontend-backend communication, and hermetic testing — and how we’ve tried to make it all just a little bit easier. And of course we want to hear from you about what else we should build that would make full-stack development easier for you!
Streamlined app previews
First and foremost, we've streamlined the process of enabling your applications frontend communication with its backend services in the VM, making it effortless to preview your full-stack application in the browser.
IDX workspaces are built on Google Cloud Workstations and securely access connected services through Service Accounts. Each workspace’s unique service account supports seamless, authenticated preview environments for your applications frontend. So, when you use Project IDX, application previews are built directly into your workspace, and you don’t actually have to set up a different authentication path to preview your UI. Currently, IDX only supports web previews, but Android and iOS application previews are coming soon to IDX workspaces near you.
Additionally, if your setup necessitates communication with the backend API under development in IDX from outside the browser preview, we've established a few mechanisms to temporarily provide access to the ports hosting these API backends.
Simple front-to-backend communication
If you’re using a framework that serves both the backend and frontend layers from the same port, you can pass the $PORT flag to use a custom PORT environment variable in your workspace configuration file (powered by Nix and stored directly in your workspace). This is part of the basic setup flow in Project IDX, so you don’t have to do anything particularly special (outside of setting the variable in your config file). Here’s an example Nix-based configuration file:
{ pkgs, ... }: {

# NOTE: This is an excerpt of a complete Nix configuration example.

# Enable previews and customize configuration
idx.previews = {
  enable = true;
  previews = [
    {
      command = [
        "npm"
        "run"
        "start"
        "--"
        "--port"
        "$PORT"
        "--host"
        "0.0.0.0"
        "--disable-host-check"
      ];
      manager = "web";
      id = "web";
    }
  ];
};
However, if your backend server is running on a different port from your UI server, you’ll need to implement a different strategy. One method is to have the frontend proxy the backend, as you would with Vite's custom server options.
Another way to establish communication between ports is to set up your code so the javascript running on your UI can communicate with the backend server using AJAX requests.
Let’s start with some sample code that includes both a backend and a frontend. Here’s a backend server written in Express.js:
import express from "express";
import cors from "cors";


const app= express();
app.use(cors());

app.get("/", (req, res) => {
    res.send("Hello World");
});

app.listen(6000, () => {
    console.log("Server is running on port 6000");
})
The bolded line in the sample — app.use(cors()); — sets up the CORS headers. Setup might be different based on the language/framework of your choice, but your backend needs to return these headers whether you’re developing locally or on IDX.
When you run the server in the IDX terminal, the backend ports show up in the IDX panel. And every port that your server runs on is automatically mapped to a URL you can call.

Now, let's write some client code to make an AJAX call to this server.
// This URL is copied from the side panel showing the backend ports view
const WORKSPACE_URL = "https://6000-monospace-ksat-web-prod-79679-1677177068249.cluster-lknrrkkitbcdsvoir6wqg4mwt6.cloudworkstations.dev/";

async function get(url) {
  const response = await fetch(url, {
    credentials: 'include',
  });
  console.log(response.text());
}
// Call the backendget(WORKSPACE_URL);
We’ve also made sure that the fetch() call includes credentials. IDX URLs are authenticated, so we need to include credentials. This way, the AJAX call includes the cookies to authenticate against our servers.
If you’re using XMLHttpRequest instead of fetch, you can set the “withCredentials” property, like this:
const xhr = new XMLHttpRequest();
xhr.open("GET", WORKSPACE_URL, true);
xhr.withCredentials = true;
xhr.send(null);
Your code might differ from our samples based on the client library you use to make the AJAX calls. If it does, check the documentation for your specific client library on how to make a credentialed request. Just be sure to make a credentialed request.
Server-side testing without a login
In some cases you might want to access your application on Project IDX without logging into your Google account — or from an environment where you can’t log into your Google account. For example, if you want to access an API you're developing in IDX using either Postman or cURL from your personal laptops's command line. You can do this by using a temporary access token generated by Project IDX.
Once you have a server running in Project IDX, you can bring up the command menu to generate an access token. This access token is a short-lived token that temporarily allows you to access your workstation.
It’s extremely important to note that this access token provides access to your entire IDX workspace, including but not limited to your application in preview, so you shouldn’t share it with just anyone. We recommend that you only use it for testing.

When you run this command from IDX, your access token shows up in a dialog window. Copy the access token and use it to make a cURL request to a service running on your workstation, like this one:
$ export ACCESS_TOKEN=myaccesstoken
$ curl -H "Authorization: Bearer $ACCESS_TOKEN" https://6000-monospace-ksat-web-prod-79679-1677177068249.cluster-lknrrkkitbcdsvoir6wqg4mwt6.cloudworkstations.dev/
Hello world
And now you can run tests from an authenticated server environment!
Web-based, fully hermetic testing
As we’ve highlighted, you can test your application’s frontend and backend in a fully self-contained, authenticated, secure environment using IDX. You can also run local emulators in your web-based development environment to test your application’s backend services.
For example, you can run the Firebase Local Emulator Suite directly from your IDX workspace. To install the emulator suite, you’d run firebase init emulators from the IDX Terminal tab and follow the steps to configure which emulators you want on what ports.
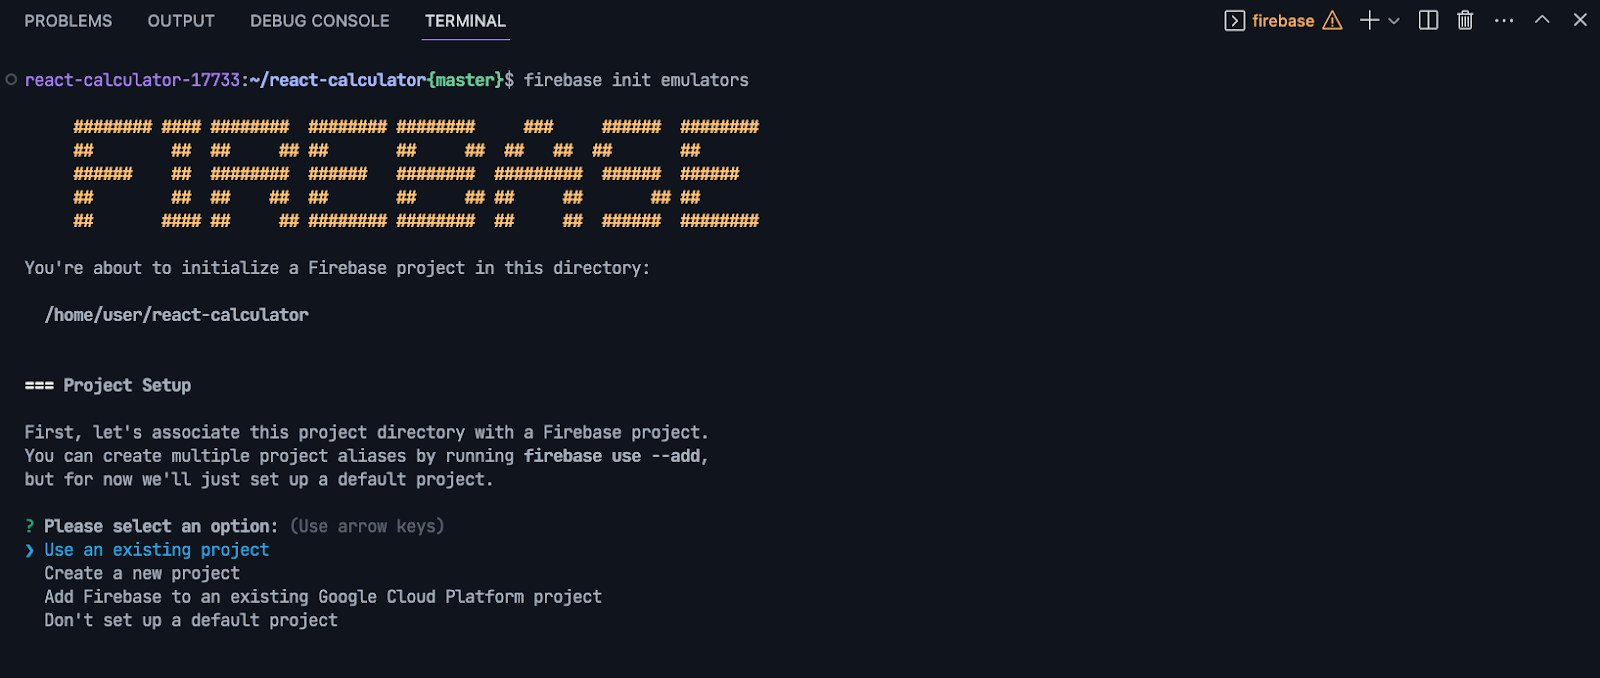
Once you’ve installed them, you can configure and use them the same way you would in a local development environment from the IDX terminal.
Next Steps
As you can see, Project IDX can meet many of your full-stack development needs — from frontend to backend and every emulator in between.
If you're already using Project IDX, tag us on social with #projectidx to let us know how Project IDX has helped you with your full-stack development. Or to sign up for the waitlist, visit idx.dev.
What's Your Reaction?


![How AI Can Improve Your Customer Experience [New Data + Tips]](https://blog.hubspot.com/hubfs/ai%20customer%20experience.png#keepProtocol)